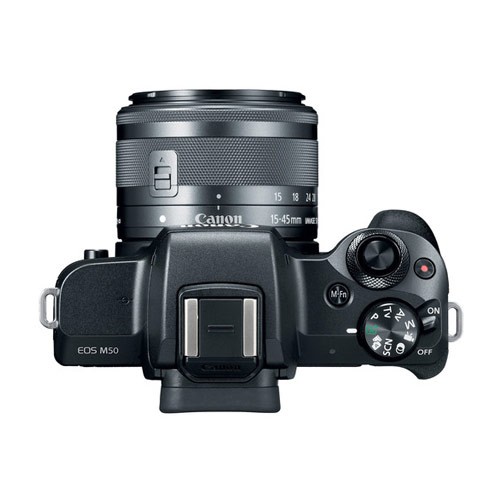
what’s up people to obtain right here and welcome to an additional tech gear talk today I’m mosting likely to reveal you what I did to turn my m50 into a video clip beast clearly the m50 is an entry-level aps-c mirrorless electronic camera however it’s really fairly qualified and also even though I such as using it as is I’ve in fact put together a total video rig that has actually functioned really well for me so allow’s go step-by-step through each element and then I’ll tell you why I selected to utilize it and I’ll additionally consist of some additional alternatives in the summary okay so at the heart of this system is the cage and I selected the little red cage as my base it’s a specialized cage designed for the m15 it gives an extremely tight fit it also adds a little bit of size to the camera the m50 is on the smaller side and also there are times especially when I’m using bigger lenses where I really feel like a much deeper hold would certainly be much more comfy so I virtually simply leave the cage on also when I’m just taking images and also incidentally I’ll have links in the summary to every item that I discussed in this video clip so you can quickly locate it I enjoy that this cage has quarter-twenty as well as 3/8 holes all the means around which offers me heaps of choices as far as installing
accessories there’s a built-in quarter 20 screw near the bottom that will certainly attach the cage to the m50 as well as I such as that it does not appear so that I don’t shed it there’s likewise called shoe install on the top left and also I’ll obtain to that in a min it was additionally really essential to me that the cage will not obstruct any of the performance of the camera so you can see that I can still access the buttons dials and also ports and also the battery compartment so I can access either the battery or the memory card port as well as I still have total range of movement with the fully articulating touch display I likewise like the truth that it secures the video camera whenever I put it down if I happen to strike it again something which obviously never ever occurs to me however, for instance if I wish to put the camera on the ground to obtain a shot with a reflection in a pool or something like that and also the ground may be a little wet I recognize that I can get the video camera right on the ground and also I do not need to worry about harming the
body currently the last thing this cage provides for me is enable me to conveniently utilize the m50 on a gimbal without having to fret concerning the lens being too high so as an example if you’ve seen my Sigma e FM triad video you know that I like utilizing the Sigma 16-millimeter f one point 4 D CDN due to the fact that I like just how large it is and when I utilize it on the gimble due to the fact that the body of the m50 is so tiny I encounter a problem where the lens really prolongs below all-time low of the m50 as well as it strikes the installing plate so with this cage on the video camera is elevated just sufficient so that where I can quickly use this lens as well as equilibrium to rig next I desired to enhance the handling as well as stability so I added a side handle as well as this is a small rig wooden Global side manage it can be installed as a right or left-handed handle yet the m50 has a totally expressing touchscreen which includes the left so I affixed mine to the right side of the cage this manage is actually perfectly made and also it’s very comfortable to hold now this deal with also has a cold shoe place as
well as a few extra quarter 20s and also a 3/8 month on top it connects to the cage utilizing these two thumb screws as well as you can get them pretty tight by hand yet to actually lock them right into place you can utilize a hex screw and also look into this very creative style right here by small gear they constructed the place for the allen wrench right into the manage it’s likewise magnetized so there is no means for it to just bulge of place as well as what I observed was that as quickly as I started handling the electronic camera with the side handle I right away obtained a lot more secure footage and smoother electronic camera movement next I desired to include a top manage which ends up doing a number of points for me I intended to be able to just quickly order this cam right off of a tripod or just carry the rig around and also this small gear top take care of is simply what I was trying to find once again there’s an additional cold shoe place at the leading and there’s bunches of quarter-twenty and 3/8 threaded holes and you can see that I’m most definitely capitalizing on that in regards to mounting alternatives the top
deal with is additionally a fantastic method to obtain those extremely reduced angle shots that I often utilize for b-roll before I relocate to the next section if you like what you have actually seen until now allow me recognize by offering this video a thumbs up it actually aids me recognize what sort of material you individuals like so that I can make even more of it and if this is your first time here go on and also hit the subscribe and also alert switches so you can keep up to date on all the current gear as well as tutorials alright so proceeding the following thing I wished to dress is audio and if you have actually watched any one of my audio relevant videos you recognize that whenever possible I tried to avoid utilizing the integrated microphone on a cam and also there are a number of concerns with any integrated microphone on an electronic camera first off they’re constantly so small and they can only do so much next premium sound elements are simply not a main emphasis of video camera suppliers they invest cash on points like much better picture high quality better iso efficiency as well as boosted vibrant range lastly and
also probably among the biggest concerns why the integrated microphone is not that terrific is that the microphone needs to be as far from the topic as the electronic camera is as well as it does not have a pick-up pattern that’s designed to do what the majority of us need which is concentrate on the subject with the m50 in this particular configuration there are a couple of various microphones that I utilize relying on the situation if I’m running as well as gunning and also I want a portable remedy where I’m always ready to go then one of my favored microphones is the dia TV mic d3 Pro it’s very compact for the top quality of the audio that you obtain as well as it comes with a built-in Rycote cable shock mount which isolates the microphone from camera movement and prevents video camera handling sound from taking a trip approximately the mic this is a shotgun mic with an incredibly cardioid pickup pattern definition that it’s gon na concentrate on noises originating from the front of the camera and it’s going to deny sounds originating from the side and also the back so all I do is connect it to the cool footwear install on the top left of the cage as well as I’m ready as
well as I utilize this mic a great deal since it’s got terrific functions like low-pass filters as well as an incredibly important plus 20 DB stepless modification gain now this allows me turn the gain down on the m50 like I show you in my configuration tutorial and afterwards I can make a change on the microphone where I get the exact levels that I desire as well as what I’m doing there is letting the microphone enhance the sound rather than relying on the m50 s not-so-great preamps now if I have a topic that’s relocating about a great deal or I can’t obtain close enough to get great audio as a result of just how the shot is framed after that my go-to is the rode Wireless go as well as this is my preferred Wireless setup now due to the fact that it’s so tiny and light so I can always bring it with me it has two parts a transmitter which will be clipped onto the and after that a receiver which will be affixed to the cage and then wired into the 3.5 millimeter mic input Jack what’s terrific about this little kit is that you do not require a lavalier mic since the transmitter has a microphone built-in currently if I don’t desire the
transmitter to appear in my video after that I can in fact plug a lavalier microphone and afterwards the transmitter can be concealed and also I’m great to go what’s fantastic regarding this arrangement is that also if the topic is moving or looking to the side the microphone is basically moving with them as well as I’m obtaining crisp and constant audio alright since I have audio looked after I intend to make things a bit much easier for myself visually currently the m50 has a fully expressing screen so I can always have it directed at me whether I’m behind the cam in front above sideways and even listed below however often it’s just better to see things on a larger display so I include an external monitor now I’m using the Andy cine a 6 plus which I connected to the call tree amount at the top of the take care of using this incredible tilt arm in this manner I can still direct the display in any instructions that I want yet I have a much bigger screen and I also have actually some added capability and
also there are a lot of points that I like concerning this display it has a touch display it has pinch-to-zoom easy-to-use operating system as well as I can make use of both Sony NPF and also Canon LPE 6 batteries to power it now I can even submit lots to ensure that if I want to fire in a level color account like cinestyle or professional loss but I intend to see what it’s in fact gon na appear like after I use the LUT I can just do that in the monitor so if you viewed my motion picture appearance tutorial for the m50 I talked concerning shooting in a flat shade profile so do you get more information in the darkness as well as the highlights the problem is that it doesn’t look that terrific on the back of the camera because it’s really rinsed so being able to apply a whole lot in the display solves that issue because it’s not really altering the documents you’re taping however it’s showing you the level file with the modification LUT used there are also a load of video clip assist functions as well as possibly the most vital ones to me are the waveforms and also the false shade charts
which actually aid me obtain a proper direct exposure the m50 has a histogram which is fantastic but the waveforms as well as the false color are simply the next level in regards to you see as well as they’re incredibly very easy to use and also once more a very effective feature that this display adds for 230 bucks I think it’s an exceptional value you obtain everything that I showed you plus there’s a heap more that I’m not also entering into due to the fact that this is an M 50 video clip next I’m going to inform you concerning some of my favored lenses the one that I use most usually not simply with the m50 however with any kind of camera that accepts it is the sigma art 18 to 35 F 1.8 you’re possibly already accustomed to this lens I just love the photo and develop top quality it’s an extremely quick lens it available to F 1.8 which also makes it a fantastic low light lens currently due to the fact that it’s created for a DSLR aps-c sensor and the m50 is an EF m install I use my EF EF s 2 EF m adapter from Canon and also it works excellent currently when I want a
smaller sized arrangement I’ve likewise been making use of the 3 brand-new Sigma EF M lenses a sixteen thirty and also fifty six F 1.4 D CDN these are definitely great lenses and I have a specialized video clip testimonial of all 3 which I’ll connect to up in the edge as well as in the summary if I intend to take the next step and utilize some of my L Collection Canon glass then I have 2 choices I can either use the same adapter that I revealed you with the Sigma 18 to 35 or I can use a rate booster like this one from comm light and after that I’m obtaining a larger angle of sight as well as an added stop of light so clearly this is a very powerful choice so for instance below I’m using it with my zeiss 50 millimeter f/2 and also I absolutely love the appearance that I obtain from this mix alright proceeding from the lenses let’s talk about lighting when I’m firing in low light and even if I simply intend to separate my subject from the history and I do not have my workshop lights with me I used the godox r1 for mobility and convenience this is my go-to light now it’s incredibly brilliant at complete power and also it’s dimmable from no to a hundred percent making use of the dial on the side there’s an LCD display on the top so I can see the battery power intensity as well as shade temperature in CCT mode I can choose a color temperature level between 2500 and 500 Kelvin depending on whether I need a
warmer or cooler light I can additionally change to HSB mode which lets me select between three hundred and also sixty various colors and after that different levels of saturation as well as brightness for every this is terrific when I wish to add a dash of color as well as it is just one of the factors that I make use of these lights when I fire a few of my b-roll I have 3 of these and also they charge making use of a USBC cord the battery lasts an actually long time and if I ever need to I can bill them on the fly with the established I include one on the right utilizing this vision adapter as well as this light aids illuminate my subject and also provides me that added pop and separation from the background or again also just some fill light and also the reason that I utilize this adapter is due to the fact that it allows me do a pair of points first off I can aim the light up as well as down whichever way that I desire and afterwards it additionally allows
me change the instructions of the light so I can constantly have it directed right at my subject there’s likewise a magnetic diffuser that I simply snap on and actually does a really excellent work at diffusing the light and also making a much softer and more flattering moving on I intend to talk a little regarding the SD cards that I utilize with my m50 I have actually been utilizing SanDisk Extreme Pro 128 gigabyte cards for a long period of time now with every one of my cams and they’ve functioned fantastic for me I have some that are a little older as well as now there are more recent as well as much faster models from SanDisk which you can obtain for much less than I spent for mine so I’ll link to them in the summary but even at the older speeds I’ve never ever had any type of problems with those cards currently I’m always gon na suggest that you obtain more memory cards than you believe you require due to the fact that it’s so important to have back-up likewise I suggest keeping additional also smaller capability cards in your bag to ensure that you never ever get someplace as well as realize that you forgot to place a
card in your cam or your card is full and also you’re constantly good to go it’s a relatively small investment in the long run as well as even if it only conserves you as soon as ever it’s entirely worth it currently talking of backup allowed’s discuss additional batteries now the m50 is recognized for having much less than optimum battery life as well as I currently have a video that reveals you exactly how I resolve this problem and now I have an also much better remedy so one of my old options was to make use of extra batteries and also I’ll connect to a few third-party alternatives which I make use of and have actually worked terrific for me and conserved me a lot of cash I likewise have a tutorial where I reveal you just how to utilize a coupler with either a power bank or to plug it
into a wall outlet but after that I discovered that about power junkie and I was hooked so generally this is a little adapter that allows you use Sony NPF batteries to power other equipment I can utilize among these batteries I obtained 2 of them for thirty 7 dollars and every one of them has greater than 5 and also a half times the battery life of an EM 50 battery so I utilized the USB coupler from the battery life video clip plug it right into the power junkie order one of these batteries as well as I’m established for a great quantity of time okay to ensure that’s how I rigged up my m54 video as well as this arrangement has been functioning super well for me I would certainly like to understand how you establish yours up and I’m always satisfied to learn and also get new concepts from you men if you have not yet ensure that you check out my cinematic tutorial for the m50 partly one I covered the finest video clip setups as well as then undergo all the configurations that you ought to carry out in camera before you even begin shooting then partially two I take you detailed via
what you need to do while you’re firing to get the ideal outcomes as well as if you want some fantastic lens options take an appearance at the sigma EFM trio i’ll place web links in the summary to all the products that i discussed in this video along with some of my favored lenses since there are always specials and price cuts and also those web links will instantly be updated with the lowest rates I actually wish that I had the ability to offer you some great suggestions about exactly how you can establish your m54 video if I did please let me understand by giving this video clip a thumbs up tweet it share it and if you have not yet join the neighborhood by striking the subscribe as well as notification buttons you can always discover me on Instagram Facebook And Twitter at techy err talk you know what I always say bye great or bye twice best of luck and see you soon