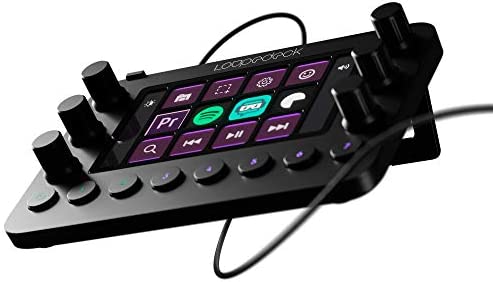
come on Alexa turn the studio on if you know me you know that I love physical buttons which is why this has transformed my production process I’ve built this studio space so that I can make videos very quickly I gave you a tour of it a little while ago which I’ll link to above if you missed that but it struck me the other day that I’ve never shown you how I actually make the videos and a bit like this studio I’ve built an editing process that is efficient and fast for me at least which is down to three things Final Cut Pro which I could not live without the process I’ve built around it and the loop deck live which I showed you at the start of this video Loop deck are very kindly sponsoring this video they gave me this Loop deck live to test and to build into my workflow I’ve done that and it has been well it’s been amazing so today I’m going to show you the process of editing a video from start to finish and how this little thing has changed the game for me so what is a loop deck Live Well if you’ve ever heard of a stream deck it’s similar to that but better and the reason for
that is quite simple it has basically all of these little squares on here which are completely customizable basically everything on this device can be customized and you can put links to websites apps certain functions within apps themselves onto these little screens these individual little screens which is very cool for shortcuts stops you having to use things like keyboard shortcuts but where this absolutely takes things to a different level is because of these things proper physical buttons twisty things I love all that stuff and if you know me you probably know that I’m not going to dig deeply into everything this can do because I just don’t need to get that complicated with it all I wanted from this Loop deck live was to improve my production process for editing videos in Final Cut Pro so what I’ve done is map the controls and the knobs and all the stuff on here to very specific things that I do every single day in Final Cut Pro so let’s edit a video now the great thing about Loop deck live is that it changes based on what you’re doing on your computer so at the moment as you can see here I’ve got my standard Loop deck screen I’ve got some system controls like volume you know play and pause links to Common apps so things like Final Cut Pro logic pro YouTube but if I go into Final Cut Pro on my laptop it immediately
switches to Final Cut Pro mode and this is the first page I’ve set up you can have loads of pages via these buttons here as you can see here and everything on here as I mentioned is completely customizable including these bits here where we can swipe up and down and put even more controls and I’ve set up on here this first Final Cut Pro screen the most common actions I use and the first job I always have with these video edits is to sort out the absolute mess of a-roll now a-roll is me doing this it’s me talking to camera waffling on about MacBooks and headphones now quite often at the end of that process I have a massive amount of footage to sort through so if we come into Final Cut Pro now you can see result of an a-roll shoot and it’s oh it’s 30 minutes of me waffling and there’s loads of stuff in here I don’t need I need to get this down basically to eight minutes 10 minutes 12 minutes at most and this is where the editing process begins and this is called killing Your Darlings which is a horrible phrase but it basically means going through and getting rid of the stuff that does not need to be in there the great thing with the loop deck live is that I can control pretty much everything I need to do basically from this thing here so it’s got things like Zoom I can
zoom into the timeline so you can see that zooming in and out of that that’s very very nice and if we go back to the start of the clip here it’s also got these kind of frame jumps so I can jump forward 10 frames at a time and if I want to get really specific with where I’m making cuts and things I can even go one frame at a time so I can really zoom in if I need to like this and if let’s say I need to make a cut right there I can position it there press that and that’s made a cut for me and then I can just click on the bit I don’t need and delete it so that’s really straightforward you can do all of that with the keyboard with the trackpad but there’s something very accurate about doing it with that little knob and this a-roll process continues so I’ll play through listen to myself listen to myself making mistakes like that think okay we don’t need any of that stuff there but I want to cut it out I want to cut it out just before that strange little audio blip at the bottom there and if I want to see the audio in more detail I can do that with the loop deck live as well so I can just scroll up here and increase the size of the waveform I can see just there if I come back down go one frame I want to get rid of that so I can just click there cut it get rid of it gone and then I’ve got a clean edit the other thing that I do at this stage of the a-roll edit is sort out the color give it a bit of a color
grade I’m not a colorist I’ve learned this myself I’ve spent a long time watching other people doing it and again like I said at the start of this video I’ve just built a process around color grading which is fast and efficient so if we come back into here let’s just get that audio waveform back down to where it was good stuff and it will go over to the right hand side and what I’m going to do is add a color wheels correction which is this one here and this gives me access to all of these knobs and slides and things here now before the loop deck live I’d come on here and use my mouse to really kind of try and get the balance right with all this sort of stuff I’m used to doing that it works but it’s not very tactile this is thankfully so what I can do is go into the color section and now I have access to all of these knobs and things that are on the screen on here so for instance if I want to change the overall saturation of the image give it a bit more color I can press Wheels Global on here and that gives me access to the global saturation slider at the top and rather than using my mouse I can just twist the knob twist twist the knob a little bit like this and get the get it just right so just get the color balance right I don’t want it to be too too kind of washed in color but that feels about right to
me the other thing I then do is improve the contrast of the image a bit so drop the blacks raise the highs a little bit and to do that I’ll start with the shadow so we just go to Wheels shadows and then we’ll do Shadows brightness which we will just just drop down again a little Notch like that nice and then we’ll do the same thing with the highlights so although in this case we’ll increase the highlights a little bit just to brighten the image nice that’s looking good and at any time I can double check I can I can kind of do like an A B test between what I’ve done so if I press select FX on off as you can see there I can just see what my changes look like pretty happy with that really mid-tones I will probably just bring down the brightness of those that helps bring out skin tones and stuff as well there we go give that give it another check that’s looking pretty good then if I want to render that image I can do that so we go back to my home screen and just do render all and that will render it get it ready to publish when I eventually publish it that alone is just so much quicker than messing around with a mouse now don’t worry I’m not going to sit here and go through this entire a-roll edit with you you’ve got better
things to be doing instead I’m going to do the Classic Blue Peter thing little one for the UK audience there and show you one that I made earlier so this is a completed a-roll edit as you can see I’ve completely removed loads of stuff so there’s lots and lots of edits here as you can see with these little lines between each of these clips all of the rubbish has gone all of the mistakes all of the ums and URS and the bits I didn’t want in there and the waffling has just been banished forever and that is the start of the editing process pretty much done and I’ve not shown you that much on the loop deck live in fact all I’ve really done is use the frame jumps you know 10 frames the one frame changing clip height changing that audio waveform height just to see what I’m doing using the backspace to delete things the cut tool all of that stuff the color editing as well that’s it I’ve not done much with it but it’s those tiny little additions to this workflow that have removed the need to rely on keyboard shortcuts that’s when I love Tech I love when Tech does this it just does something very simple you can kind of get rid of all the
complexity that it can do it doesn’t get in the way at all and just use the bare functionality that makes your day much easier next up we have the edition of b-roll which is the exciting bit it’s when we can add images of products and all that sort of stuff so all the kind of footage that I shoot of the thing that I’m talking about that now gets overlaid on top of the a-roll and in this instance obviously I’ll have lots of footage of the iPhone 14 pro Max these are all my Clips here that I’ve shot previously and now it’s just a case really of going through this a-roll listening back to it and adding b-roll where it feels most appropriate and again the loop deck live comes in very handy here because I can very quickly zoom into where I want to be I can get exactly where I want to be to put that b-roll on and b-roll for me has to be very specifically placed and very accurately placed as well and one of the most important things for me is adding b-roll in the exact right place and again that is where these little frame
jumps come in handy so if I know that I want the b-roll exactly to appear right there I’m a bit finicky like this that’s just me I want it just to appear there I can use the one frame jump to position the cursor then grab the piece of b-roll that I want and let’s Final Cut Pro snap it to that exact point that makes me very happy indeed the other thing that I often do at this stage is add text overlays which are normally there to further explain something I’m talking about on the screen or correct mistakes more often than not and they’re called basic titles in Final Cut Pro adding them is quite straightforward it’s just a keyboard shortcut but for whatever reason I always just found that quite annoying so now I have a button specifically for adding a basic title on the loop deck live so what I do I come on here so again I keep talking about it I’m bit boring sorry but this one frame adjustment getting it exactly right so if I want right there that is where I want the text to appear all I do now is press add basic title bang it’s there I can’t not mention the undo button which is just fantastic now undo that’s a universal thing command Z fine but I’d rather just press a button so if I didn’t want to add that title for instance I can just press undo which is this number one here it’s gone done happy with that and back to the b-roll I just keep adding b-roll to the video like this it’s very straightforward it’s a lot of fun this process pick out the bits that I want but I end up with this where I’ve got lots of b-roll that also needs
color grading so again I turn to the loop deck live and it’s just so quick so I come back onto here I add a color wheel correction on here and then straight into color and I’m back into Wheels Global but the other thing that is really useful is that I can very easily copy and paste settings so I this might not be the best way of doing it if you do color grinding a different way we all do it differently I think to be honest but I is the way that I do it so I do the color grading on each clip and then copy the settings once I’m happy with them and paste them onto the other clips that haven’t been color graded yet however it does require an annoying combination of keys on the keyboard not anymore thanks to this so again if I’m just gonna change the color here of this clip let’s just do it very quickly show you how quickly I can do this let’s bring the Shadows down again a bit like that this is a very like I say a very quick and dirty I do take a bit longer normally this is a quick and dirty example um let’s just say that just double check yeah and that’s looking good then if I go back to my home screen I can basically do a copy attributes that copies all of those settings all of those color settings go on to the next clip and do paste all attributes and bang There we go I’ve got my pasted color Corrections on that clip the other thing that I take very great care with is audio that is very very important to me and again the loop deck live comes in very handy there so there’s a separate audio section on this so
if I just quickly go back to my clips and make sure we can see plenty of that audio waveform nice we’re just going to zoom out as well so we can see the entire project happy with that good stuff and the first thing I do to make sure there’s no annoying clicks where I’ve made edits so when you make an edit a hard cut between point a and point B on a piece of footage the audio can sometimes click when you join them together because there’s no natural flow it just kind of clicks and clashes it’s horrible and in Final Cut Pro you can get rid of that by adding audio Fades but it’s one of those features that’s hidden away in a stupid menu somewhere so what I’m going to do is select all of my audio and on the loop deck go into audio and then just do apply audio fades done but you can do lots more stuff in here you can add keyframes very easily so if you want to add a keyframe to a piece of audio here for instance I can just press that and then press it here again this is very useful if you want to introduce little fades in like that very very useful adding keyframes again you can do with a keyboard shortcut but look how much easier that is I just choose the section where I want to add the keyframe hit that I want it to end there and then I can change it so easy but you can do so much
more you can disable the audio very quickly if you want to monitor things you can match audio you can detach it from a clip if you want to do something with it oh and select all I forgot to do that I mean that would have been an easier way of doing it I’ve just discovered that I didn’t realize you can actually do select all rather than doing the mouse thing there you go I’ve just literally discovered something I didn’t know it did and that is a big Time Saver as well a finished video looks something like this and it looks probably looks like a bit of a mess actually but these are basically all of the clips all the a-roll all the b-roll all of the little text overlays the little graphics and things I add everything is done that is an entire video finished and ready to upload I have I’ve found I’ve got to be honest that the loop deck live has probably it’s difficult to put a Time on how much effort it saves but it’s definitely making the editing process two things a bit quicker but more importantly more accurate and also I’m spending less time trying to remember keyboard shortcuts trying to think what was that shortcut I used to use for that well I don’t have to do that anymore there was just a button on there that I press and it’s done and while I’m here I think it’s worth showing you how easy it is to configure this yourself this takes me into the loop deck software which gives me this live preview of The Loop deck itself which matches what is on the
screen so if I press a button on the loop deck it will take me into there now it’s currently set to the Final Cut Pro profile but if I go back to my Mac OS default one and one of the most common things I’ve done with this home screen is add links to Common websites and apps that I use so let’s say I wanted to create a link to my own website because I’m a YouTuber and I’m obsessed with myself basically on here I can go into web page give it a name so we’ll call it mer for Mark Ellis reviews paste in the address click on Create and then that creates that button for me and I can just simply drag it onto the loop deck and then as if by Magic it appears on the loop deck itself and when I press that it will take me to my website that’s really really handy but again going back to Final Cut Pro they’ve got all of these profiles built in After Effects audition illustrator Lightroom classic Photoshop honestly guys if you use Photoshop I’m not a big Photoshop user or Lightroom for instance this is amazing in terms of giving you those physical controls for your most commonly used features if you just spend some time in here like I have
done and set it up the way you want it if you just sit down and think right what things do I use all the time then it’s just so easy to do it’s worth that effort so again if I go into my Final Cut Pro screen here this isn’t what came with loot deck they gave me like a well it gives you a kind of default set of what it thinks is the most commonly used features in Final Cut Pro didn’t quite match with me so instead of having to keep going into editing and color I added these things here like render all those copy attributes paste attributes and then I realized that you can add even more stuff down here so as you as you’ve probably seen earlier in the video I’ve been swiping on here to get access to different features so I can swipe on here and again whatever I do on here is mirrored on the software and I can start to add other things to those adjustments it’s got macros as well so you can create a very specific command for whatever it is that you need to do but the key conclusion I’ve drawn with the loop deck live is that that stuff doesn’t get in the way like I said earlier it’s one of those things where you make it work the way that you want it to work and this is now firmly a part of my production process and the great thing is as you’ve discovered during this video is that you keep finding things to add to it so my advice is if you get a loop deck live don’t sit there and do that thing where you think right what do I do what are my most common features but don’t go overboard just make a list of the things that you do all the time and add them to your own pages and over time
you’ll build this great little thing that is personalized for you and which is making you more efficient so in the process of editing this video now and I’ve just realized I completely forgot to plug my Final Cut Pro skillshare class and that goes into much more detail about this editing process it takes you through the exact steps I go through and you can try it for free so just click the link in the description and go and check it out so I’d like to thank Loop deck again for sponsoring this video and sending me this Loop deck live it has changed things for me guys so thank you I’ve just had some great news from Loop deck they’ve just sent me an email which I’ve got here and basically if you’re a Final Cut Pro user like me they’ve launched a new plugin the plugin is called command post I’ll put a link in the description so you can check it out but basically it gives you more options with the loop deck and Final Cut Pro including rotate scaling positioning cropping and distorting the image with the dials big thumbs up the color wheels are now more sensitive with this plugin that’s good news and you can add things like effects Transitions and generators with a button on the loop deck live it does lots of other stuff as well but I just wanted to quickly mention that before I publish this video again I’ll put a link to command post in the description and I’m going to check it out right away and if you want to check out Loop deck yourself just click the link in the description and if you’ve still got some time and you want to see more of what goes on behind the scenes in the studio keep watching for a link to my full production desk tour video
Read More: iPad 10th generation review – NOT WHAT I EXPECTED!